EzTimeRental
  • About
  • Vendors
  • Platform
    • Features
    • Notifications
    • POS
    • Staff Accounts
    • Multi-Branch Feature
  • Pricing
  • Docs
  • Social Platform
  • Jobs
  • Get Started
Select Page

Getting Started

4
  • Read First
  • Step 1 Adding your business info
  • Step 2 – Setting up your vendor profile
  • Step 3 – Adding your app fee payment method

Products

8
  • Understanding products
  • Set products to be visible to staff or customers
  • Understanding maintenance / grace periods
  • Tips for adding products and services
  • Adding a rental product
  • Adding a product for sale
  • Adding variants to products
  • How to add addons to a product?

Packages

2
  • Understanding packages
  • Creating packages

Orders

6
  • Understanding orders
  • Understanding delivery/travel fees
  • Understanding security deposits
  • How to set blackout/vacation dates
  • Processing orders
  • How to add notes to orders

Payments & Refunds

2
  • Tracking payments per booking invoice
  • Can I verify that my payments are correct and will be deposited?

Staff Accounts

8
  • About staff accounts
  • Product review permission
  • View order list amount permission
  • Reply QA permission
  • Order POS payment permission
  • Order email permission
  • Edit product permission
  • Edit order permission

Site App Fees

2
  • Where do I view the site fees that I have paid?
  • Are app fees returned on a customer refund?

Branch Features

5
  • How do I create a new branch?
  • Tip on creating a new branch
  • Can I set account security levels for my branches?
  • Is there an additional cost for the branch feature?
  • How does the Branch Feature work?

WordPress Plugin

3
  • What is the EzTimeRental WordPress plugin for?
  • How do I install the EzTimeRental WordPress plugin?
  • How do I remove the EzTimeRental WordPress plugin?

Remote View Code

1
  • Code snipet for any site

Fees & Taxes

2
  • How are taxes on products handled?
  • How will I report my income at the end of the year for taxes?

Vendor Tips

4
  • Stock management
  • What to do when an order comes in?
  • Planning delivery or travel time
  • Labeling your items

Vendor Site

19
  • Coming Soon!
  • What is a Vendor Site?
  • Does it also come with email service or accounts?
  • Is this service production ready?
  • How to login into your vendor site
  • How to change your site name
  • How to add your logo
  • How to customize the look and feel of your site
  • How to add your own domain name to your site
  • How to add a new page to your site
  • How to add a new post to your site
  • How to add, change or rearrange your website menu
  • How to log into your vendor site hosting panel
  • How to backup your site
  • How to add additional plugins to your site
  • How to view the log files for your site
  • How to gain terminal access to your site
  • How to access your file manager
  • How to FTP to you site
  • Home
  • Docs
  • Vendors
  • Products
  • Adding a rental product

Adding a rental product

  1. Go to your vendor dashboard after logging in
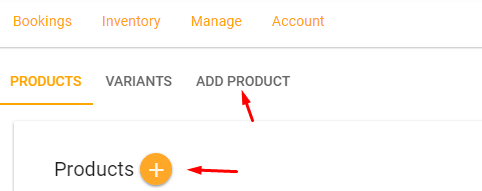
  2. On the menu bar above go to “Inventory” then “Products”
  3. To add a new product, you can either click on the tab “Add Product” or the “+” sign next to “Products”

Make sure on the top of the screen that the “Rental” toggle bar above is set to “Red” meaning it is a rental product. If not then select it so that it is “Red”.

  1. In the name field give your product a name
  2. For “Category” select the root category for the product that you are selling
  3. Under that selection, the proper sub-category is selected for your item.
  4. For Maintenance / Grace Period add the number of days that you would like to add ahead of tomorrow’s date (The system by default allows customers to book for the next day after today’s date)
  5. Under “Interval” select whether your product or service is rented by “Day” or “Hour”
  6. Under “Rental Deposit” by default it is set to 50% of whatever the booking total would be. You can change this if you like (but suggest that you leave it at 50%)
  7. For “RentalMinDays” or “RentalMinHours” set the minimum number of hours or days for this product. (If not needed leave it blank)
  8. Under the “Variants” section click “Add Another Variant”
  9. Fill in the section with any name, size, price, and stock level (If a physical item place the stock number. If a service place the # of resources you have to fulfill the service “Personnel”)
  10. Under “Additional Images” you can upload more images to display your item
  11. Scroll all the way to the bottom to the section “Description”
  12. Write an eye-catching and detailed description of the product that you are renting. Remember the more detailed you are and the more information that you provide the more chances you have of making a booking and fewer customer inquiries regarding that product or service.
  13. When completed click “Save”

Now your product or service has been created and submitted for approval. After your product or service has been reviewed if all is well the product or service will be approved and live on the site. In the event, something is wrong with your product a staff member will reach out to you for corrections.

Still, need help? Contact Us

What are your Feelings
Share This Article :
  • Facebook
  • Twitter
  • LinkedIn
  • Pinterest
Still stuck? How can we help?

How can we help?

Tips for adding products and servicesAdding a product for sale

Connect with us

  • Contact us
  •  866-862-0026
  •  [email protected]

EzTimeRental

We are a team of passionate people whose goal is to improve everyone’s life through innovative products. We built our product with one goal in mind. To improve on the way the event rental life cycle process is handled.

  • Facebook
  • X
  • Instagram
Copyright © EzTimeRental